Interested in how to start a DIY vermicomposting bin?
If you are looking for instructions about how to care for worms after you’ve built them a home–here it is. Your new hobby goes by many names: vermiculture, vermicomposting or worm farming. I chose this style of do-it-yourself compost bin because it can be accomplished by people that have less than five minutes per week to dedicate to this hobby.
I can assure you, vermicomposting bins WILL turn food waste into organic fertilizer for flowers, houseplants or garden plants if you put in the appropriate amount of effort.
There are many different kinds of compost but worm farms or vermiculture are a wonderful way to start a kitchen composting bin, particularly when your space is limited.
A lovely side effect of feeding your kitchen scraps to your worms is that you will be diverting waste from landfills. Mother Earth thanks you in advance.
Pick Your Vermicomposting Bin
You will need three dark-colored bins with a lid. Choose stackable bins to create two or more layers.
Each of the stackable layers needs 3/16″ drill bit holes two to three inches apart in the bottom to allow worms to travel from one level to another. The idea is that the worms will transition to the next layer (chasing the new food) and leave their casting behind (for you to harvest).
The holes allow for aeration and movement. It also makes the castings easier to harvest (because the worms have moved on).
The bottom bin will be used to capture excess liquid called leachate. The aeration holes ensure the worms live in a swamp free environment. Proper aeration keeps your bin from having an unpleasant smell.
What kind of worms do I need to start a vermicomposting bin?
Let me introduce you to the amazing red wiggler (Eisenia foetida for you scientific types). They are the quietest pets you will ever have. Added bonus: they are toothless so they will not chew on your shoes. Feeding them fruits and vegetables is best–that’s good for our environment.
Fun fact: they eat half their body weight per day–a few kitchen scraps that were bound for the garbage can anyway. One pound of red wigglers will recycle half a pound of organic matter in 24 hours. This means everyone wins!
If you take a few seconds and divert food waste to the worm bin, they will give you the most beautiful organic fertilizer you can get. I’ve read that worms are like the moist inside of your mouth–treat them accordingly. I’m here to encourage you to give these toothless wonders a chance!
Red wigglers are a fan of the dark side (for you Star Wars fans)–they don’t like the light so I use a dark-colored bin.
Use red wiggler worms (Eisenia foetida) not earthworms
You won’t find red wigglers in garden soil because they have a hard time moving through compact soil as easily as earthworms. They are surface feeders, you may find red wigglers near organic conditions such as a compost pile or under rotting logs in the wild.
However, unless you know exactly what you are looking for, identifying them may be tough. It will be difficult to identify the differences between the Lumbricus rubellus and other worms. I like to buy them locally, so I recommend buying them at True Leaf Market.
It takes about one pound of worms (1,000 individuals) to start a large (27 gallons or more) compost bin.
The breeding cycle is approximately 27 days. Worms can double in population every 60 days. Whoa! Get your mind out of the gutter, they are hermaphrodites having both male and female sex organs.
Because red wiggler worms reproduce quickly, they should occasionally be divided (similar to your most prolific perennial plants). You can share them with a friend, put them in your garden, or put them in your outdoor compost.
They prefer damp conditions because it allows them to breathe through their skin.
As we mentioned above, red wigglers are surface feeders so they need organic debris to thrive in their new location.
PRO TIP!: I live in Utah, we love to talk about disaster preparedness; worms are edible which means they are a great source of protein if the situation gets really tough.
What is a worm bin or vermicompost bin?
In case we jumped in too quickly with “worm care”, composting worm bins or vermiculture bins are low-maintenance and are usually small “batch” type of vermicomposting system.
Bins are easy to maintain because they incorporate composting into your everyday life. Indoor vermiculture bins can last for extensive periods of time–even years if you desire.
If you don’t want anyone to know why your house plants look so amazing, store a small bin somewhere out of sight. Your secret might not last long, I show my worms to dinner guests–is that weird?
I use plastic tubs for moisture retention. Moisture is very important for a system, (let’s be honest, the system is most likely going to endure long periods of neglect). For a small system (12 gallons or less), I suggest adding no less than 100 worms; this is about a handful
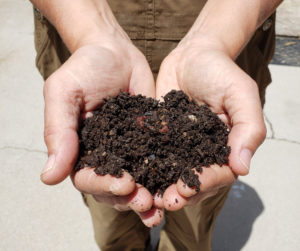
Handful of castings Compost
Make sure to cover them up with some burlap or newspaper before you put the lid back on. Not because they’re ugly but because it keeps the moisture in and the light out. It also keeps the fly population down (if you keep them outside).
Having coverage will also encourage the worms to come to the surface and feed. Always put the lid back on to prevent flies from enjoying the feast.
What kind of bedding do I need in my DIY vermicomposting bin?
Vermicompost bedding or worm bedding should be damp, edible (organic), pH neutral, easy to move through. You should also maintain a constant climate (between 40F-80F degrees).
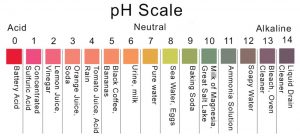
If you’re not a chemistry major: the pH scale ranges from 0 to 14. A pH of 7 is neutral. A pH less than 7 is acidic. A pH greater than 7 is basic. To sum up: if you put normal kitchen scraps and “brown” bedding in the bin, this should take care of itself.
Worms need a diverse mix of bedding; it should be moist yet light and fluffy. Bedding should be the consistency of a wet sponge.
The list of possible bedding is pretty extensive: shredded paper, newspaper, cardboard (including cardboard food packaging that cannot be recycled), non-glossy paper magazines, brown paper bags, paper stuffing, packages made from paper or even aged sawdust. Note: Glossy paper magazines may contain toxic inks so I normally stay away from these.
PRO TIP: shredded corrugated cardboard increases cocoon production and is a good long-term food source.
Worms need some grit–occasionally add a handful of sand or dirt. This will provide worms with something for their gizzards.
To increase your odds of success, start with existing vermicompost with a proven ecosystem. A lot of times, worms come with vermicompost when you start your bins.
PRO TIP: Be careful not to include any thin plastic from mail envelopes when you shred your paper.
How do I feed my red wigglers?
As we mentioned at the beginning of the post, worms eat and digest roughly half their body weight every day. Worms like their food room-temperature (or so they tell me).
Worms feed on equal parts of bedding (carbon) and food scraps (nitrogen).
Provide an equal amount of “green” and “brown” foods. Green food: lawn scraps or food scraps are high in nitrogen. Brown food: (worm bedding) paper, cardboard, and aged sawdust contain the necessary carbon component.
I normally cut my scraps into small bits with a knife. If you are REALLY motivated, you can blend the vegetables before you put it in the bin. They especially like kitchen scraps blended and served as a slurry. Can’t you picture the worms screaming with delight when you pour it into a dirt hole in their bin?
The smaller the bits of food, the easier it is for the worms to process–remember they are toothless.
There isn’t a set feeding schedule for worms. The amount of food needed can vary from season to season, so be sure to observe your worms’ eating habits regularly.
There are two ways you can feed your worms, either smaller amounts more frequently (weekly), or large amounts less often (monthly). If you choose the latter method, know that occasionally mold can grow on the food. If this happens, just move the food to your outdoor compost pile.
What do worms like to eat?
Favorite food: They like a variety of food; this includes most kitchen fruit and vegetable scraps. You can add cooked or uncooked grains (rice, oats, barley, wheat, etc.), apples, lettuces, eggplant, berries, squash, and greens. You can also feed them moderate amounts of spent coffee grounds.
As mentioned above, chop into small pieces to avoid the produce from going sour. This is especially true for bananas, pumpkins, squash, and fruit cores.
Eggshells are good for the garden, so if you crush them up, and put them in the worm farm, they’ll end up adding calcium to your soil. If the shells are too big, the worms will curl up inside of them. Can’t you picture the worms using the shells as furniture?
Avoid feeding worms onions, garlic, meat, seafood, poultry, dairy, citrus fruits (including oranges, limes, lemons, and grapefruits), processed grains (e.g., bread, cereal, and pasta), oils (e.g., olive or coconut oil and oil-based dressings), salty and spicy foods (e.g., french fries, pretzels, nuts, peppers or chiles).
Also, avoid any processed food or artificial sweeteners or fertilizers. Any chemicals that are harmful to most living organisms are not welcome in the worm bin.
Avoid large pieces (e.g. , avocado seeds), full eggshells, or woody stems, as they will be hard for the worms to digest (and you will end up sifting them out later).
What kills worms?
Lack of air circulation is a common cause of compost worms dying in their bin. Even if your bin came with plenty of pre-drilled air holes, they can become plugged, causing oxygen starvation. Worms breathe through their body and need air to survive.
Too little food may lead your worms to eat their own castings. Castings are poisonous to worms (who knew?). Make sure you have enough organic material for them to feast on.
Too much food can create excessive moisture. Nature is amazing–it will encourage other organisms to naturally correct the environment. Overfeeding can create an unfavorable environment leading the worms to their ultimate doom.
Potato skins: As a member of the nightshade family, potatoes are relatively high in solanine. Solanine is a toxin that acts as a pesticide. So, it should come as no surprise that compost worms avoid the potato peels. However, like all organic matter, potatoes will eventually break down and become transformed–it just might take longer.
Moldy food: It’s best to add moldy vegetables and fruits to a backyard composting bin or pile. Mold cells are just one of the many different types of microorganisms that take care of decomposition and are fine in a backyard bin. If you’re using a worm bin, you have to be a bit more careful. Chop the food into smaller bits and bury it in the bin if you don’t want to deal with this.
Dead worms: It’s hard to find dead worms in a worm box, but they do die in the box. If you find a lot of dead worms, you should find out the cause. High heat (above 84 degrees) or freezing is fatal to them. Too much salt or acidic food waste can kill them. Too much water is also not good–remember worms can’t swim. So, unless you are going to give them life jackets, keep the moisture down.
Vermiculture moisture
Typically, you do not need to add any water to your compost as 80% of plant material is water. The system I use compensates for this with a catchment basin on the bottom (the excess liquid drains from the top bins to the bottom bin). Too much moisture will produce anaerobic conditions, making your system smell.
Nobody in the vermiculture business is in the perfume business; the compost should resemble an earthy bloom. Let your flowers be the only fragrance producer.
The soil must be damp at all times. Remember, this is how worms breathe. Never let the soil dry out or put the worm box in hot places. They need to stay fresh and warm and as wet as a sponge (not soaking).
Controlling moisture through Vermiculture aeration
Worms burrow, helping aerate and breaking down chunks of matter. This also brings airflow into deeper layers to speed things up, while getting healthier, more beneficial bacteria (aerobic strains) to colonize soil more successfully than unhealthy, anaerobic ones. Remember, a well-maintained indoor worm bin has a mild, earthy smell. If it stinks, something is wrong.
PRO TIP: Mix your vermiculture material periodically. I mix and feed every two weeks on the same schedule as watering my indoor plants to ensure aeration in the bin.
Yikes! What are these organisms in my vermicomposting bin?
Additional organisms are a necessary part of a diverse ecosystem. These organisms are not pests; they simply correct the environment and are an indication of environmental conditions. Very few organisms are bad.
Springtails are the most common and are an ally, not a pest. They colonize food materials to assist worms in the decomposition process. They are attracted to mold and fungi.
Isopods are shredders of course materials and indicate that the environment is too dry.
White Mites are relatives to spiders and are non-harmful scavengers. They are often mistaken for worm eggs. They indicate poor air circulation, excessively wet environments, usually due to overfeeding.
Pot Worms also known as white worms, indicate that conditions are acidic or too starchy in the composting bin. They are commonly mistaken for baby composting worms but baby red wigglers always have some color and are thicker.
Outdoor organisms:
Millipedes usually found in an outdoor compost area and are shredders of organic materials.
Centipedes are found in outdoor compost bins and are predators that feed on all creatures and do eat small worms but are not overall harmful, they just keep the populations of other organisms down.
Rove Beetles are found in outdoor bins and come in all shapes and sizes and are commonly mistaken for earwigs.
Earwigs are found outdoors and are omnivores. For the most part, they are not common in compost.
Harmful pests or worm predators include carpenter ants, red fire ants, army ants, moles, and raccoons. As I mentioned before, worms are a good source of protein.
Why should I start a vermicompost bin?
After reading all of this, you might still be wondering if you should start your own vermicompost bin. I have two reasons:
- Vermicompost bins are a simple way to reduce food waste (good for the environment)
- Vermicompost also creates organic fertilizer that is good for indoor and outdoor plants (good for me)
Reduce Food Waste.
Methane gasses come primarily from our unsustainable farming methods and food waste.
Methane emissions also result from livestock and other agricultural practices and by the decay of organic waste in municipal solid waste landfills.
According to researchers, 60 percent of methane emissions are caused by humans and livestock animals, while natural sources such as wetlands cause about 40 percent of methane emissions.
Human sources include agriculture, especially animal agriculture and rice production, waste, and fugitive emissions from industry including the energy sector.

Create organic fertilizer.
Many synthetic fertilizers are composed of cheap, low-quality ingredients like ammonium phosphate and several other chemicals that can be toxic to your soil and plants with no regard to adverse effects on the soil.
While synthetic fertilizers may make your plants look pretty, they will not have the nutrients to create a healthy environment that will enrich the soil and deter pests. Compost is the best alternative. Even if you use synthetic fertilizers, adding worm castings periodically will be helpful in the long run.
Now that you have castings what do you do with them?
The worm casting can be sprinkled on potted plants, over garden beds, or add a handful directly in the bottom of a planting hole.
Casting can also be mixed with potting soil, in concentrations of up to 20 percent castings, to make a nutrient-rich grow mix.
PRO TIP: Castings are potent–a little goes a long way. The best part: worm castings won’t burn the plant roots like many nitrogen-rich fertilizers.
Another option is to make compost tea. In general, you can make tea by mixing 1-8 cups of casting per gallon of water, depending on how strong you want it to be. Remember, a little goes a long way.
I am sure you are ready to turn those food scraps into rich organic fertilizer for all of your plants. Let me know how your bin is doing. You can also write to me if you have any questions.
~Janine
