Tomatoes are one of the most popular plants for home gardens because they are relatively easy to grow and produce an abundance of fruit. The reason why tomatoes are a great place to start, especially when you are new to gardening, is the possibilities are endless on color, size, and growing style. Let’s get started!
Beware of the Side Effects of Gardening
The beauty of a home garden is the chance to experience the difference between the nutrient density and the taste of home-grown versus what you get in the grocery store.
After my first season of gardening as an adult, my first aha moment was when I looked at the difference between the beautifully displayed perfectly symmetrical tomatoes on the store shelves versus the ones I had grown in MY garden.
I thought to myself, “what did they do to make them so uniform and shiny?”. The grocery store tomatoes look and taste nothing like the ones from my garden. Humm?
The most significant side effect of gardening besides callused hands and a sweet farmer’s tan is that your perspective on food changes. Gardening allows one to respect the amount of effort and time it takes to grow your own food.
You may also find your favorite gardening outfit is overalls and fancy gardening shoes. Wink.
Picking A Tomato Type & Variety
Picking the best tomatoes depends on what you plan to do with them.
If you plan to eat them off the vine, a smaller cherry size is excellent. My current favorite is yellow pear (small pear-shaped with a sweet citrus flavor) and jelly bean (red, tiny, and sweet). Smaller varieties are also great in salads adding bursts of color and sweetness.
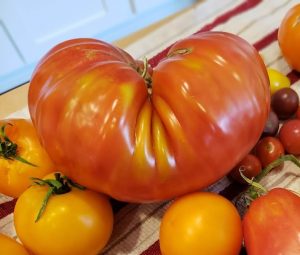
Are you looking for the perfect slicing tomato? A large tomato variety is better. The most popular are beefsteak (huge, ribbed fruit, and can grow up to three pounds).
Want to impress your Italian friends? Famous saucing tomatoes such as the well-known Roma or the San Marzano tomatoes. They are meaty and have fewer seeds but need some time over the fire to present their best flavors.
If you plan on canning, then Determinate tomatoes are your best bet. Determinate plants grow to predetermined height and amount of fruit. They are an excellent choice for canning and sauce-making because the fruit ripens at the same time.
Indeterminate tomatoes are the best choice if you want to spread the harvest throughout the summer as they increase in height and production throughout the growing season. Plant these types of tomatoes for Summer salads, slicing, and delicious BLTs.
Maybe something in between is best for you. My new favorite tomato is the Hamson, which is a large, smooth, deep red fruit on semi-determinate vines. When sliced, it has a meaty texture and less juice than larger tomatoes. This variety was developed in Utah for its adverse climatic conditions and will set fruit at extreme temperatures.
Once you decide how you will consume them, then pick the best type for your plan. The varieties are endless—my favorite local company and where I get the majority of my seeds. I also love to see what’s available at my local nursery.
Location, Timing, and Spacing
Choose a location with ample space. Plant tomatoes about 2 feet apart for both small (bush-type) or larger plants. Tomatoes will need support with stakes, trellis, or cages. Allow 4 feet between the rows to ensure proper access and airflow between the foliage.
Wait until outdoor temperatures are a consistent 60 degrees through the night to plant tomatoes. Tomatoes have a low tolerance for cold, and frost will damage or destroy them.
Tomatoes like it hot and will need 6 to 8 hours of direct sunlight.
Transplanting Tomatoes into the Garden
The first thing you want to do is prune the bottom leaves. The base of the plant has a purple color. Use this as a guide and remove the leaves slightly above the purple color- about two or three sets of leaves.
Measure the pruned leaves and dig a hole to bury the plant deep, so the pruned stem is underground.
Remove the plant from its pot and gently loosen the roots. Fanning out the roots will help develop a more robust root system and a healthier plant.
Dig your hole according to your measurement,12 – 14 inches deep, or twice as big as the root ball for each plant.
Prepare a bucket of aged manure, potting soil, or compost fertilizer and work a handful of into each hole before you place the root ball. Acting as a starter fertilizer and will help get the roots off to a good start.
Don’t be afraid to experiment, many gardeners swear by adding a whole, cracked egg, rotten banana, aspirin, or Epsom salts when planting as a natural fertilizer.
PRO TIP: Plant tomatoes deep to encourage root development. The little hairs on the stem will become roots given the opportunity.
Center the plant in the hole as you push in the dirt around it. Pat the soil down gently to remove air pockets, make a moat around the base of the plant to collect the water. Water immediately after planting.
Don’t be alarmed if they look a little sad for a few days; it is called transplant shock. It shouldn’t last long as they get used to their new home.
Container Planting
If growing in a container, use a large pot with drainage holes. You will need a fresh potting mix with plenty of organic material. The only nutrients the plant will get comes from the soil and what you feed it.
Remember, you get what you pay for in life, and potting mix is no exception. Go for organic and avoid synthetic additives.
Organic materials such as straw, grass clippings, wood chips, sphagnum peat moss, or humus-rich compost have high moisture retention.
Off the beaten path options for retaining moisture in your soil is a synthetic Polymer Moisture Crystals or a natural Retain Plant Water Absorption Crystals. Synthetic crystals or gels are a similar type of martial in diapers but are formed into beads or pellets and sold in small portions. Also sold as a Hydrogel and is used in sheets for commercial growing.
PRO TIP: When it comes to fertilizer, more is not better. Don’t overdo it; follow the instructions unless you are using vermicompost.
BE sure to only plant one tomato per pot to keep the roots from having to compete. Find a place to ensure the plant will get no less than 6 hours of direct sunlight. Eight hours is optimal.
Keep the soil moist. Containers will dry out more quickly than garden soil. Check daily to ensure the soil is moist and adjust watering as needed. Hot days will require more water.
The type of tomatoes that do best in pots are the dwarf varieties and smaller cherry-sized tomatoes. Taller varieties need a support structure but have worked well for me in the past. Give it a try, especially if you have a small space.
Care and feeding
After temperatures remain above 60 degrees consistently, both during the day and at night, you can add a thick layer of mulch to retain moisture around the base of your tomato plants. The best types of mulch include straw, hay, aged bark chips, or peat moss.
Plant some marigolds near your tomatoes to deter pests. They are beautiful, and the bees will love them as well. 
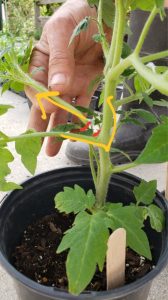
To promote upward growth, use a wire cage, steak, or trellis for support. Use a soft string, rubber wire, strips of old fabric, or garden twine loosely around the stem to the structure. Check them often to ensure the string is not cutting the tender stem.
Fertilize when you first plant to get them off and to a running start. Once the plants set fruit, it is okay to start lightly fertilizing or feeding the plant nutrients every other week.
When choosing a fertilizer, make sure to choose an organic fertilizer that is not mass-produced. Compost is your best bet, and you can make it yourself with the garden, food, and yard waste.
Offer a cup of compost tea. If you don’t have compost and are interested, it is easier than you think. Check out how to build your own vermiculture bin.
PRO TIP: Avoid using excessive nitrogen; it will promote luxurious foliage but will delay flowering and fruiting. Go for compost or vermicompost.
Pruning for Growth
After your tomato plants reach about 3 feet tall, remove the leaves from the bottom foot of the stem. Pruning encourages upward growth and prevents the sun leaves from picking up any diseases from the soil.
Pinch and remove suckers that develop in the crotch joint of two branches. The suckers are what I refer to as “the boy parts”; they do not produce any fruit and take energy away from the fruiting process.
Pruning is different for determinate versus indeterminate plants. Determinate plants begin with a “determined” size and amount of fruit at birth, which means that you want to prune them for optimal growth, making sure to avoid cutting any part of the main stem.
Indeterminate need a bit more pruning and can be coaxed near the end of the season to produce more fruit by topping (cutting the top) the plant.
Watering
Water deeply and regularly while the fruits are developing. After the fruit begins to ripen, you can ease up on the watering. Then start to water deeply every other day.
Tomatoes don’t like to have wet leaves, make sure to water the ground and not the foliage. The very best method is a drip system on an automatic timer. After a year or two of dragging a hose around, I highly recommend finding a way to automate your watering.
Water in the early morning to give the plant the moisture it needs through the hot summer days.
PRO TIP: For better flavor, reduce the water until the leaves wilt. The slight drought will coax the plant into concentrating its sugars. Don’t get too crazy.
I look forward to seeing your beautiful tomato plants. Share your “mater” pics on our Facebook page @akitchenfromscratch or our gardening community @gardenlifestyle.
~Janine
